Machine Learning in the Cloud with Android mobile phone
As a data scientist I am completely dependent on my laptop. I love my MacBook Pro but in more than one occasions I wished that I could be able to do my magic without the need of carrying a laptop.
I mean, how cool would it be if I could use my Android phone as a machine learning ready computer? Be able to play with some data while on the go?
And then it came to me. How about using the Android as a screen and a sleek bluetooth keyboard to type in? But this in not powerful enough. I need to mitigate the lack of full linux implementation all the Android terminals have. How about launching an Amazon EC2 instance in the cloud with all the necessary machine learning tools? And then connect to it with the Android? Epiphany.
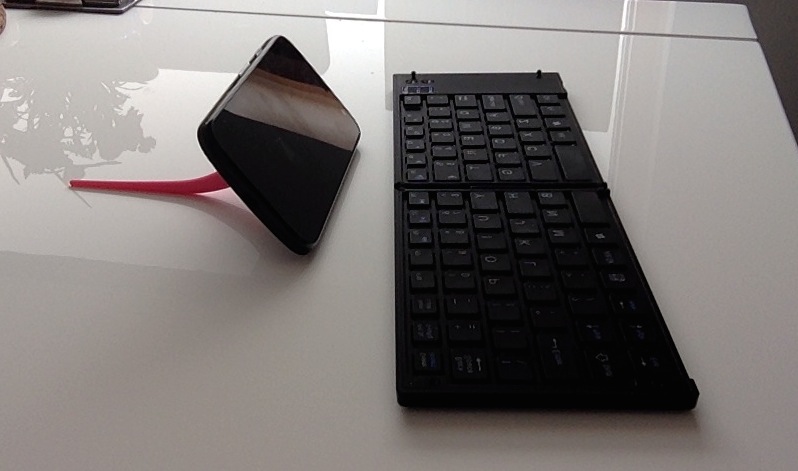
I am sure I am not the first to have throught of that setup, nevertheless I have researched a lot and I have made it easy to do it yourself. I tried many iterations on how to achieve the perfect result and I finally got it. From a hardware perspective apart from an Android smartphone you will need the following:
1) A mini bluetooth keyboard. The best one you can have is the Perixx Periboard-805. It has a nice feel when the buttons are pressed and the keyboard layout is very good. Definitely compatible with Android devices through bluetooth. Good battery life and very slim when folded (13 mm). You can carry it in your jacket's pocket when folded. All that for 25 quid only.
2) What about battery life? I mean bluetooth and screen usage of the Android can pose a heavy burden on it. So how about an external battery that can be used to juice up your phone while you are using it as a data powerhouse? I bought the Anker Astro E4 Portable Charger.It costs around 30 GBP and it has juice for up to 7 recharges of the phone. Practically it is more than a full day of working with the Android continuously. It is just perfect for the job and good value for money.
3) An tail suction holder to hold my phone standing. It does the job perfectly well and it is very portable, not to mention super funky ;-). Only 7 quid.
Now that we have all the hardware ready lets set up our software. First thing you need to do is register for free for aAmazon Web Services account. After signing up log in to your account management console then and go to "EC2 Virtual servers in the cloud" option. Choose instances and then Launch Instance. Choose the instance of your preference but I believe that Ubuntu Server 14.04 LTS (PV) 64-bit is more than enough for some data science on the go and the server setup script below is for Ubuntu only. Click on "select". On next step click on "review and launch" on the right bottom of your screen and then "launch" again. Choose create a new key pair and name that key pair the way you want. NEVER lose that key pair. Click on download key pair and keep it safe for a moment. Choose "launch instance". You may go to the Instances selection from the EC2 Dashboard and handle this instance in the future. Send the key pair file to your email and download it in your Android device (press on save on your device's email).
Off you go to Google Play now on your Android. Download: AWS Console and JuiceSSH. With the AWS console app you can control your instance at any time. Open it login it and choose EC2 Instances tab. Click on the one you have created a few minutes ago and write down the public IP address. If you want to shut the instance down remember to choose stop and not terminate because terminate effectively deletes the instance. You have 700 hours free tier from Amazon for this micro instance. If you need more juice there is always the option to choose more powerfull instances which are not actually so expensive. That's the magic of cloud computing. Power on the go. Open JuiceSSH in your Android phone. Select manage your connections. Choose New Connection, right bottom part of the screen. Choose Nickname for the connection, leave type as SSH. For the address use the public IP address that your wrote down from your AWS console a while ago. This address changes every time you stop the instance so make sure to put the new one every time you restart the instance, or just leave the instance running. Tap on Identity. Choose New. Jot down a Nickname for username choose ubuntu, leave the password blank and tap on Private Key. Choose Import--> File Path and enter /Download/name_of_your_key_pair.cer . This is the file you have sent yourself an email before. Press OK and then Save. Press save again on the next screen. Now tap on the new connection that you have created. Press accept when/if it prompts you to accept the key.
Congratulations so far! You are almost there. The only thing you now need to do is setup your server. Intimidating? Not so much. I have just the right recipe for you, "Chef" styled. In just three lines of code you will have a server with NodeJS, MySQL, Apache and Octave, emacs and screen ready with no fuss.
Just execute the commands below in your session in Android that you have just connected. Press Y to any prompts you get and set a password for your SQL server when prompted and answer Y to all the next questions about SQL safe setup if you do not know what they really mean. Make yourself a coffee. It may take some minutes for the script to end...I wanted you to have the latest version of GNU octave which you will have to compile. By the way, if you are bored waiting for it to compile you can just leave it work in the background and do whatever you want with your Android device.
It can take several hours to compile the octave so if you are really-really bored to wait for the latest version of the octave to be compiled you may just press CTRL+C to interrupt the compilation and then type sudo apt-get install octave to install the last stable (not the latest though) version of octave.
Miraculously your server is now setup! Just type "octave" in the command line and enjoy the fruits of your creative passions with your super portable cloud computer!
If you enjoyed that post then share the love below...


comments powered by Disqus